Anchoring: Your Strongest Phlebotomy Tool
“Oh no, no blood!”
Anchor: To anchor, you want to use your thumb to pull the skin and subcutaneous tissue downwards and taught. This helps the needle puncture the skin with less force and therefore less pain for the patient. Anchoring is the number 1 way to avoid “rolling veins”.
The goal is to locate the vein in relation to your needle. Use the hand not holding the needle to palpate over the vein. I always recommend training both hands to feel for veins, which can be beneficial in situations like this.
Remember that veins should ideally feel bouncy. Hard and dense structures may be tendons. Subcutaneous tissue feels squishy and muscle feels hard. If a vein feels hard, it may be scarred or sclerosed.
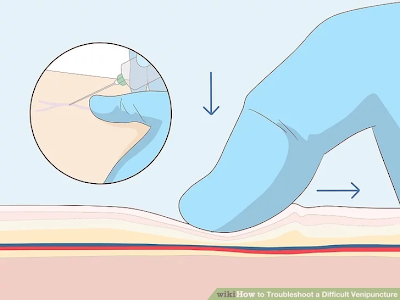
Reposition
There are so many ways to adjust that are NOT fishing. When you reposition, you have an idea of where the vein is in relation to your needle and you have a plan for how to get there. Fishing is blindly poking into the arm hoping to run into a vein.
Firstly, try to pull your needle back slightly, before your bevel comes out of the skin; be careful not to pull the bevel out of the skin, otherwise you will lose the vacuum in your tube.
Once you’ve pulled back, feel for the vein again and adjust the angle of your needle to where the vein should be, then advance your needle forward gently. Remember, you should have a target point in mind.
"What could my needle be doing?"

1. Not in deep enough: What it feels/looks like: Like you’re already in the vein. You might say to yourself “it feels like it’s right there!” How to fix this? Anchor and slowly advance your needle into the vein until you get blood flow.
2. Too deep, too steep of an angle: What it feels/looks like: Like you’re already in the vein. You may get only a small, short spurt of blood and then nothing. You may see a bruise begin to appear, and sometimes the patient may feel more pain than usual if this happens. How to fix this? Decrease the angle of your needle and pull the needle back slightly until blood flows.
3. Barely puncturing the vein: What it feels/looks like: Like you’re already in the vein. You may get very slow blood flow or blood flow in spurts. This can often cause a vibrating or buzzing sensation that can be felt or heard as the vacuum of the tube tries to suck. How to fix this? Anchor and slowly advance your needle into the vein.
4. Attached to the wall of the vein: What it feels/looks like: You are in the vein. This usually happens due to a bend, curve, or fork in the vasculature. You may experience the vibrating/buzzing sensation with this problem, as well. How to fix this? When assessing your patient’s arm before poking them, feel up and down where your draw site is so that you can know if there are any curves, bends, or forks in advance, and try to avoid them. If you happen upon this anyway, pull back your needle slightly. You may need to reposition your needle.
5. On a valve: What it feels/looks like: You are in the vein. You may experience the vibrating/buzzing sensation when this happens. Often, you can get short spurts of blood flow instead of a steady flow, sometimes this will just cause blood flow to slow down a lot, and sometimes this can cause the vein to collapse completely and no longer give any blood. How to fix this? Pull your needle out slightly, you can also try slight repositioning if just pulling out does not produce blood.
6. Not shown: Needle to the side of the vein: What it feels/looks like: You may be able to see the vein to the side of where you poke. When feeling with your feeling finger, you may be able to feel that the needle is to the side of the vein. How to fix this? Pull your needle out slightly and reposition according to where you feel the vein is in relation to your needle, then advance your needle until you get blood flow.
7. Not shown: Collapsed Vein: What it feels/looks like: The visibility of the vein may go away; the vein may feel flat, no longer bouncy, or as if it is no longer there. How to fix this? This is often due to a weak vein and a strong vacuum. The first thing you can try is to remove the vacutainer tube and see if the vein reappears; if it does, try again with a smaller tube (smaller tube = weaker vacuum) or if you need to re-poke the patient, use a smaller needle to create a smaller vacuum. If you’ve removed the tourniquet, put it back on if you are able to, or have someone assist you putting the tourniquet back on.
"How do I prevent this?"
Anchor!: Anchoring is your most useful tool in phlebotomy, don't underestimate it.
Arm Position: Position the patient's arm in whatever the best position is for you to feel the vein and see your draw site. The best position is typically as flat (or as close to 180 degrees) as possible; this also helps keep the vein a bit more steady.
Vein Selection: This is different for every patient and every phlebotomist. Even if you've drawn a patient's blood from the same spot several times before, it's a good idea to feel the whole area, still; you never know what may pop up until you feel. You can also rotate the patient's arm for better vein access if needed. In school, they teach us to prioritize the median cubital vein (the middle one); secondarily, the cephalic (outer edge); thirdly, the basilic (inner edge). This doesn’t mean you should exclude a vein if it’s not the “priority” vein. Choose the vein that you feel the most confident that you can get blood from.

Tourniquet: the tourniquet should be placed at least three inches above the draw site. If the tourniquet is too close to the draw site, this can cause the skin to wrinkle in a way that makes it difficult to feel the veins correctly. It can also lead to hemolyzed specimens because the red blood cells can rupture with the increased pressure at the draw site.
Choose the best needle for your draw: This can vary so widely per situation! Once you find a vein that you want to use, use your judgement to decide which needle to use. A 21g needle is great for most blood draws; it's small enough that it won't hurt very much, but large enough to transport blood into the tubes quickly. 23g butterfly needles are great for veins that are very weak or small. Since the needle on 23g butterflies is smaller than the 21g needles, the vacuum on them is not as strong, which can be helpful to the phlebotomy process if the vein is very thin or very weak.
Comments
Post a Comment